Showing posts with label how to. Show all posts

Thursday, 31 March 2016

Face of the day (Barely There) - April Fool's 2016

Hi Sparkles,
What do you mean I missed an Easter egg....?!?!

Are you about to embark on a long Thursday evening knowing you'll basically needto take the "dead" off your Friday morning work look? Sorry to be mean, but I'll probably still be snoozing or reading in bed since I'm off on leave this week - but fear not. I'm still here to help.

Easter Sunday was the day following one too many Bloody Marys and running up to some wine and excesses. I therefore wanted to look fresh and vaguely human but couldn't really be bothered putting in the effort to look insta-fabulous.

Look no further than the no makeup makeup.

Product list is below - my key tip would be that it's worth it to layer thinly on the skin to get a luminous finish but coverage where you need it. The Vitazing is definitely too dark for me, but a tinted moisturiser / luminser as a base is the way forward (as is perhaps a light dusting of bronzer) for days when you feel less than the best version of you. Go forth and blend kittens...


Til next time - love, hugs and happy weekending.


xx Josephine xx

Perhaps a clearer view, with the old scraped back hair.
Face
#Origins Vitazing tinted moisturiser,
#Tarte full coverage foundation (Light to Medium Sand),
#MAC pro longwear concealer (NW20)

Brows

#Illamasqua brow cake (Motto)


Cheeks

#Bourjois Aqua Blush (Inge-nude)*

Lips

#Bourjois Color Boost crayon (02 Fuschia Libre) *


While I have yet to reach the heady heights of interest from sponsors, products indicated with a * were not bought and paid for by my own fair hand, or that of a friend or relation.


Thursday, 8 October 2015

Tutorial Thursday: Eyeshadow (1: basic shaping / shading) **PIC HEAVY**

Basic, shaped eye shadow placement. Subtle colours for liner focused look. 
Morning Chaps and Chapettes!

Per my earlier posts on liners, this is the kick off chapter in my second eye tutorial series which is going to be about eye shadow application options (following on from my basic eyeliner tutorial on Saturday - link here, and cat eye liner on Tuesday, here). That, and a few coats of mascara should see you right with any of the eye shadow methods I outline in the coming weeks.

Tuesday, 6 October 2015

How to Tuesday: Eyeliner application (2: Day to night / dramatic) **PIC HEAVY**

Morning readers!
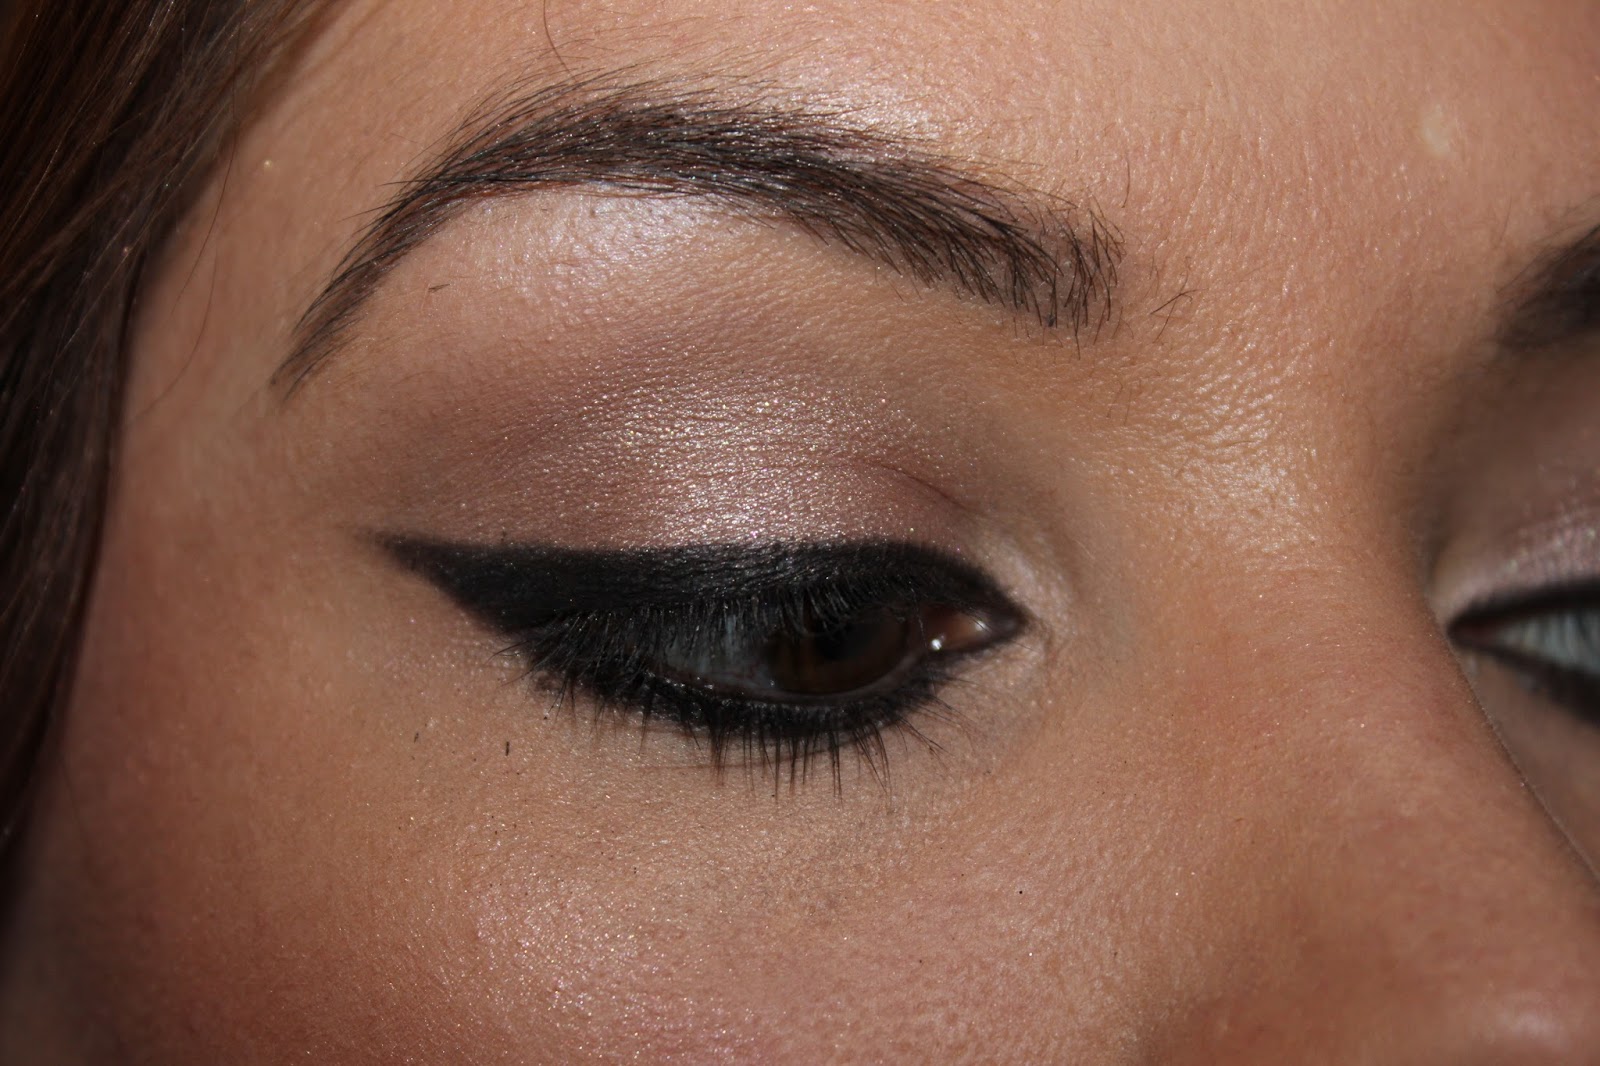
Less subtle than my last version - a cat eye effect liner / flick. A personal fave. 

I hope you've been practicing your basic eyeliner technique - and hopefully gained a little more confidence in your chosen medium (pencil / gel / liquid) or even played with another kind or colour than usual.

I'm going to cover three basic looks over the course of the eyeliner series, which with some Googling you will easily be able to deviate from to cover off lots of different variations.

Wednesday, 11 February 2015

What's that about Wednesday... Brow tutorial

Happy Humpday Sparkles! 

I've had a request for an eyebrow tutorial, so am obliging albeit slightly after the fact for the lady in question! With the rise of Cara Delevigne etc in the bushy brow brigade there's increased awareness of how they really can define and frame your face like no other part of your makeup. Now is a great time to be starting out with a variety of actually good high street products so you can play with various formulations at relatively low prices to figure out which suit you best. 

The tutorial below uses just my trusty Illamasqua brow cake (shade: Motto) as I use powders on a daily basis for a softer finish. While I think some of the stronger looks photograph beautifully I don't personally find them wearable in real life. 


You can get a similar finish with a pencil, a spoolie and a light hand. Alternatively try an eyeshadow in a similar shade to your brows to start out with. For blondes use an ashy taupe colour. Apply with a slanted eyeliner brush (they come in most brush kits so you've probably got one lying around somewhere). 

So...where to start. First make sure your brows are sitting correctly and flat - run a spoolie through them, or an old toothbrush if you're stuck. Btw don't buy a spoolie - make your own in a pinch by cleaning an old mascara wand off once it's done. 


When colour is fresh on your brush I first fill in the tail of the brow. This will be the darkest naturally (on me at least) so I apply first. 


Next up I define the bottom line of the brow. For me, I follow the natural shape of my brow but if you've got really sparse brows you could use a brow or liner pencil to draw on your desired line. Blonde pals check out MAC's brow pencils or Maybelline for light shades which will hopefully work for you. 


Next up I pop on the top of my arch - I fill this in from about halfway across my brow to join up with the tail of my brow. I prefer quite an angular brow shape but you can fill in to your taste.


You'll see above I've left the middle third of the brow empty of product other than the bottom line. That's because the next step is *using only the residual product on your brush* to just buff on colour to fill this in. 


While I've done the rest of the brow using horizontal strokes, to fill on the middle I'm using vertical. With a powder this is less important but if you're using a pencil this will ensure the strokes look as close to the existing hair growth direction as possible. Less "scouse brow" and more natural - but feel free to block off if that's how your tastes run. Nothing like experimenting to see what you like best! 

And here's the finished look as well as a half and half - I definitely can see the difference once the brows are on. So much so it almost pained me to do my face for this look without putting them on!! 


If you want to define more then you can use a concealer pencil underneath the brow and over the arch, blend lightly and set with whichever shadow highlight you use (or not). 

Hopefully that was helpful - if you've got any other brow recommendations in terms of applications or products let me know in the comments!! 

xx Josephine xx

Wednesday, 6 August 2014

Killer Cheekbones - Contouring for Evil Queens

Salutations Your Majesties

Thanks for popping by again for your Humpday make-up update. Per requests, today's post is a "How to" for one of the most essential weapons in the arsenal of any beauty queen - some cheekbones second only to your wit in terms of sharpness.

As beautifully illustrated by Mr Williams the key here is to make the cheekbones stand out through highlighting the top while creating a shadow underneath, to emphasise the bone structure. This pictorial is for a much more subtle look than that sported by Kim Kardashian - but I think that's ultimately better given that we don't walk around everyday under a million flashlights.

Sunday, 3 August 2014

Smokey Eye Looks: Colourful version

Greetings Guys and Gals,

So I started the smokey eye series back in February when I first started on the blog and actually never quite finished before disappearing into my rather dull day job for a few months. Now I've re-surfaced and joined the blogging world again I thought I'd finish the original eyeshadow series.

For my skin I applied Illamasqua Cream foundation (#133) on my cheeks, centre forehead, chin, upper jaw and centre of my nose. I then used MUA Cosmetics concealer on my temples, under my cheek bones, edges of my chin, lower jaw and sides of my nose. I set that all with translucent powder and went to work on the eyes.

Saturday, 22 February 2014

Smokey eyes: full on look

Hi Beauty Addicts!

Sorry for the recent break in transmission - some IT issues meant that I wasn't able to load up my tutorial as planned last Saturday. This is look number two, I've tried to use more pictures than words this time to keep it shorter ;)

Step 1:

I did my face make-up first but if you're using loose shadows I'd recommend following the previous recommendation of doing that after your eyes. I then used some cream shadow (don't worry about being too neat because we'll blend later) and some gel liner pencil.

Step 2:

Next up blend a co-ordinating powder shadow over the cream base. I've used a metallic shadow for extra sparkle but matte will also work. It's a personal preference. I then blended upwards with a matte taupe transition shade. Re-line with more gel liner and blended that out with a darker shadow. I've gone for browns but you can try taupes, greys or blacks. Colours up next week....if you're feeling daring today go for purple, green, blue or pink but with similar shading approaches.

Step 3:

I've popped on my Out of the House eyebrows and then added more liner (this time liquid for a really black finish around the eyes) and lined my water line with kohl. I then added a little sparkly eyeshadow on the inner corners and the inner third of the eyelid. Final touch - some lippie, et voila! Good to trot off to the pub / date / party / sofa with The Voice as you choose!!


Products used:

Primer (Charlotte Tilbury Wonder Light), Foundation (Becca luminous finish - Olive), Contour and highlight (Sleek Contour palette), Blush (Illamasqua Tremble), Cream shadow (MAC Constructivist), Gel liner (Avon Supershock gel pencil), Powder shadows (Bobbi Brown Metallic Plum and Nars Mekong), Liquid liner (Illamasqua Precision Liner - Abyss), Mascara (YSL Effet Faux Cils), Concealer (Illamasqua Skin Base Lift - Light 2), Lipliner (L'Oreal Ultraviolet), Lipstick (Illamasqua Scandal).


Hope you guys have a fab Saturday and if you're watching the Six Nations....Go IRELAND!!!!

Love and coral kisses

Josephine

xxx

Twitter: @JojoSparklesNI
Instagram: @josephinesparkles_ni

Saturday, 8 February 2014

Smokey eye looks: Liner focused smokey eyes


Further to my first post, which set out different interpretations of smokey eyes, this is the first of three in a series which will take you through a step-by-step guide to recreating those looks and recommend some products which I've really enjoyed using along the way.


Products used: Illamasqua eyebrow cake (Motto), Topshop cream shadow (Tundra), L'Oreal taupe shadow (from Marron Glace quad), Avon Supershock black eyeliner pencil, Bobbi Brown eyeshadow (Caviar), L'Oreal white shade (from Marron Glace quad), YSL Effet Faux Cils mascara and MAC Moisture concealer.

Step 1: Create a pretty, even base colour

I like to use a cream shadow as a base, which can be easily blended and either built to added intensity or sheered out if you prefer a more subtle look. Often you'll see this kind of look done with a gold or bronze shade. If that appeals I'd recommend;

- Chanel Illusion d'Ombre (Emerveille); or
- Maybelline Color Tattoo (On and On Bronze).

If you've got oily lids you may also wish to set with a powder shadow - not recommended with the Chanel as you don't want to hide that beautiful finish!

For those of you who prefer a cooler toned base colour you might want to look at the these shadows;

- Bobbi Brown Metallic Cream Eyeshadow (Brown Metal, Galaxy); or
- Maybelline Color Tattoo (Tough as Taupe).

With the darker shades I've recommended you'll probably want to sheer them out a fair bit, or be bolder with your liner choices, to maintain the distinction between the liner and the shadow.

Step 2: Lay down your basic liner shape

When I'm smoking out a liner I prefer to use either a loose powder liner (e.g. No7 Smoky Eyes liner - Smashbox also do one but I think the No7 is a lot cheaper for the same effect) or a gel liner which I blend out with a similar shade of eyeshadow in order to avoid having a defined line.

I'm a massive fan of the defined line, but it's not the purpose of this look!

For gel eyeliners I would recommend;

- L'Oreal Gel Intenza; or
- Bobbi Brown's gel eyeliner.

If you prefer your gel liner in a pencil form look no further than Avon Supershock eyeliner pencils - I much prefer them to the pot version - or Rimmel Scandaleyes.

Step 3: Smoke out the liner with some powder eyeshadow

While it's not mandatory to use a matching shadow I think it helps set the liner, soften the line and maintain the intensity of the colour. Use a shadow which is pigmented enough to be used as a pseudo-liner but which isn't so soft it falls out all under your eye area....note: you probably should do base after a smokey eye regardless of version!

I'm not going to recommend a specific shadow because I'm sure everyone will have a shade knocking around their make-up bag that will do. You can also drag it outwards a little and sweep into your crease to give added intensity around the outer-V of the eye (see above).

If you're feeling a little lazy and want one product to do Steps 2 & 3 for you, check out No7's powder eye liner. Takes a bit of practice to not end up with powder all over your face :) If you've got small eyes you will want to really intensify the liner on the outer third of the lower lash line and the outer half-to-two thirds of the top lash line.

Step 4: Line your waterline (inner rim of the eye)

To me, this has to be black, black and more BLACK!! The liner is all about glamour here so go all out.

My preferred product is a 50p kajal pencil which a friend brought me back from holiday in India. However, assuming you're not jetting off around the world these work pretty well too;

- Rimmel Scandaleyes (you'll have to reapply with gel liner) or kohl liner; or
- Laura Mercier (Black Violet).

If you've got small eyes this may not be something that you want to go with. Instead, you might want to line the waterline with a light coloured pencil. White can be a bit '80s (though I have a shimmer white gel pencil from Sephora that I think is relatively subtle and use on occasion) so usually I'll use a nude shade. Rimmel do a great one in their Scandaleyes range, which is very moderately priced.

Make it more wearable by... switching up the eyeliner for a grey or khaki shade, which will still give you definition around the lash line but feel less "made up". I recommend Laura Mercier Black Gold, Bourjois Khol or Avon Supershock gel liner in khaki shades.


Products used here: Brows as before, Benefit cream shadow (Recess), Becca eyeshadow (Satin), No7 powder liner in brown and YSL effet faux cils mascara. Here I haven't lined the waterline to show the alternative method.

How to: smokey eyes

Happy weekend Beauty Addicts!

One thing a lot of my friends ask me about is eye make-up application. While my make-up addiction is fairly well rounded, it has to be said that eyeshadow is a personal favourite - love to play up the peepers!

In any case, when you're starting out it can seem quite intimidating to slick on the dark shadow, black liner and three layers of mascara so I thought it would be useful to set out how I apply the shadow first and then suggest some colours / products depending on your eye colour and your colour confidence.

I don't have a dupe list at the minute but what I would say is that there is an increasing tendency for drugstore products to really up their game in terms of performance so do have a play when you're out and about in the shops to see what you like (and what's within budget).

Placement styles for a smokey eye

1) Liner focused (e.g. Mila Kunis' day look)

For Mila's look I always think of a dewy, subtle wash of colour with a really sultry smoked-out liner that surrounds the eye, including waterline (inner rim of eye for newbies).

2) Classic / full-on (e.g. Kirsten Stewart / Mila's evening look)

Here I'm envisaging a look which has a block colour - probably black or chocolate brown - which is applied full across the lid and then blended up and out to increase the impact of the eyes. Depending on your preference you might keep it quite precise in the application, or make it look a bit "lived in" for extra rocker chic.

3) Colour incorporation (I bow down to you, Katy Perry)

I love an alternative to a classic smokey eye which you can achieve really easily by using a colour rather than the classic black / chocolate. My personal favourites are green and purple, but a navy is also awesome and quite a modern take.


First up is the most natural of the lot, so take a peep, have a play and just enjoy yourself - makeup should always be fun!!

Love and hugs

Josephine

xx

Twitter: @JojoSparklesNI
Instagram: josephinesparkles_ni

Come follow me!!! :)


Related Posts Plugin for WordPress, Blogger...